POS Printers: The Cheapest & Most Flexible Labeling Solution You're Not Using
Using a thermal printer and label paper, printing labels is surprisingly easy and cost effective. All you need is a little vibe-coded http server, and you're one click away from printing labels.
Technical Summary
Thermal printers and their paper stock is very cheap. They are network-connected, and the ESC/POS standards they support are relatively well documented. Vibe-coding a label-printing solution for this stack is the ideal in terms of ease, flexibility, and cost. Estimated time: 2-3 hours
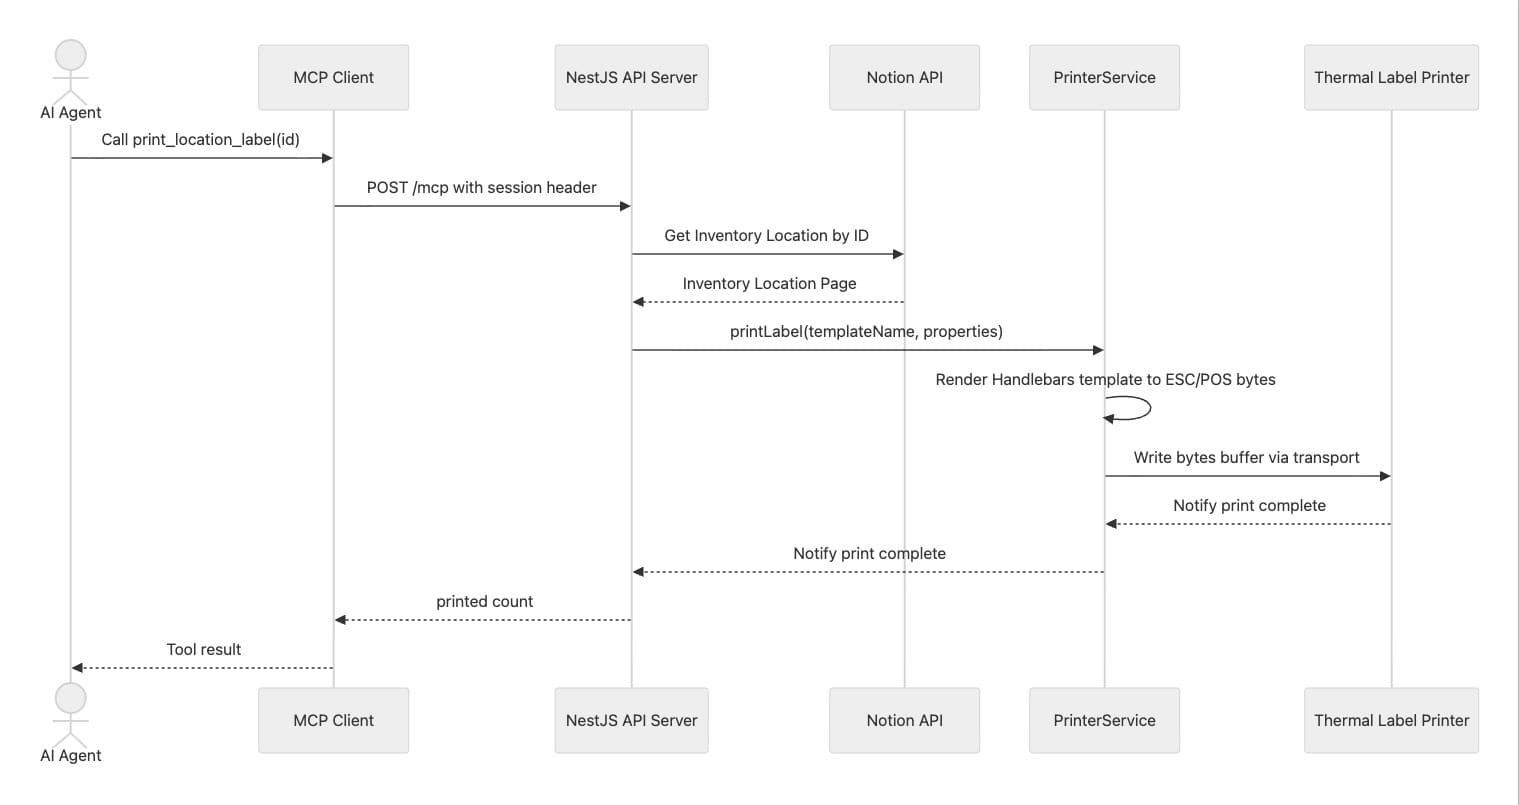
Bonus (skip to bottom): I also added an MCP Server so my AI-agents can print labels for me, or I can (lazily) print stuff from my AI chat sessions.
MCP Server
The MCP Server is just a thing wrapper on top of things to instruct AI-agents on how to work with this stack:
Background
A year ago of writing I was fed up. I'd wasted enough of my life rifling through bins full of junk (to my mind, everything you own is effectively junk if you can't find it – or worse, never use it). I began a massive undertaking: reorganizing and cataloging the "inventory" of our entire household, using Notion as the Database.
But once things had been sorted into their proper place, I needed labels.
Here's what I set out to do, and my criteria:
- Print out four (4) labels for each inventory bin
- Each label should have the bin ID and a scannable barcode
- Labels should be printed in bulk; printing one-by-one was not an option
Experiment #1: MS Word + A4 Apli Label Sheets
My first solution was to use my existing printer. The idea was:
- Acquire A4-sized Appli Label sheets (or similar brand)
- Download one of the templates for Microsoft Word
- Use Microsoft Word mail merge feature to print my labels
- Peel and stick!
This was a nightmare at each step! Here's why:
The Problem with A4 Label Sheets
Label sheets are a bit expensive, and only come in set sizes. But the sizing chart is a minefield of custom sizing. Which size did I need?
I spent far too much time reading the sizing charts, comparing the size to the space I needed to fit my labels, and then triangulating that with the inventory available on Indonesian e-commerce. What a waste of time!
Also, what if I just need one label (not an entire sheet)? Well, it is possible to send a partially used label sheet through the printer, only printing in a few cells – and then keep the half-used sheet for another time. But now I have more junk – several half-used label sheets cluttering up a drawer near the printer. Not ideal.
The Problem with Label Templates
In theory, each label vendor provides easy-to-use, ready-made label templates that you can just open up in Microsoft Word and go to town. The reality is nowhere near that simple.
The label templates are a relic of another era. They're not even in the more recent .docx format. And then there's an OS-compatibility issue. Microsoft Word for Mac is not the same as Microsoft Word for Windows (surprise, surprise!)
Getting the label templates imported into MS Word and working correctly was much fussier than I'd anticipated. But I eventually got it working. Next, on to using the mail merge feature to quickly and effortlessly print out the hundreds of labels I needed (or so I thought).
The Problem with Mail Merge
Mail merge is a relic from another time. The first mail merge predates computers – it was designed for a typewriter, and read the data off of a magnetic tape [[1]]. Reader, believe me – feeding a physical magnetic tape into a typewriter is probably more intuitive than the mail merge UI in modern MS Word.
You know that rage-inducing quirky feature of MS Word where a seemingly innocuous space or line feed throws the entire document into unmitigated chaos? Yeah. That's even worse when you're trying to get everything to fit precisely into the full page A4 – where the cells and columns must exactly fill the screen. Adding mail merge fields to label templates was frustrating, to put it mildly.
Exporting from Notion for Mail Merge
My inventory locations existing in my Notion DB. But I needed to feed these into MS Word's mail merge to print labels.
So the process was something like:
(1) Notion → (2) Export → (3) CSV → (4) Download → (5) Unzip
→ (6) Import into MS Word
Every. Single. Time. Oh, and there's a fun surprise about exporting from Notion for use in MS Word's mail merge. Read on.
"Special" Characters
Any software developer who's worth his salt has had to handle escaping characters, escaping, and the like. Unsurprisingly, the ancient mail merge feature of MS Word has lots of characters it just doesn't like.
To combat this, I wrote (vibe coded) a small script to cleanse the Notion CSV output so it could be used seamlessly in MS Word's mail merge.
So now the full process looked like:
(1) Notion → (2) Export → (3) CSV → (4) Download → (5) Unzip
→ (6) Run Cleanse Script → (7) Import into MS Word
And then:
(8) Place Apli Labels on Printer Manual Feed Tray → (9) Click Print
→ (10) Select A4, Orientation, Scaling, Double-Sided Off, etc.
The Problem with Problems
After wrestling with these issues, I was able to get labels printing (after wasting many – not inexpensive – Apli label sheets). It worked, but at what cost?
A bad system will beat a good person every time.
— W. Edwards Deming [[2]]
This was not a viable workflow. It was death by a thousand cuts.
Thermal Printer to the Rescue
I was working on a separate project – auto-printing a physical "receipt" for each household task, so our family can follow a simple kanban inspired workflow.
In a moment of epiphany: wait, don't they sell adhesive/sticker rolls of thermal paper, too? Why not use that for labels?
Here's the new setup:
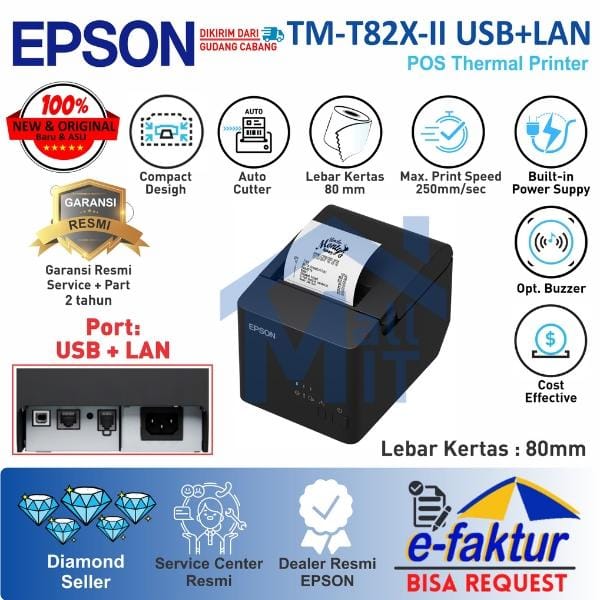
- EPSON TM-T82X-II (crucially, includes LAN connection)
~ $135 USD - Role of Thermal Stickers (15 meters)
~ $2 USD - Node.js micro-server & Svelte UI (fully vibe-coded
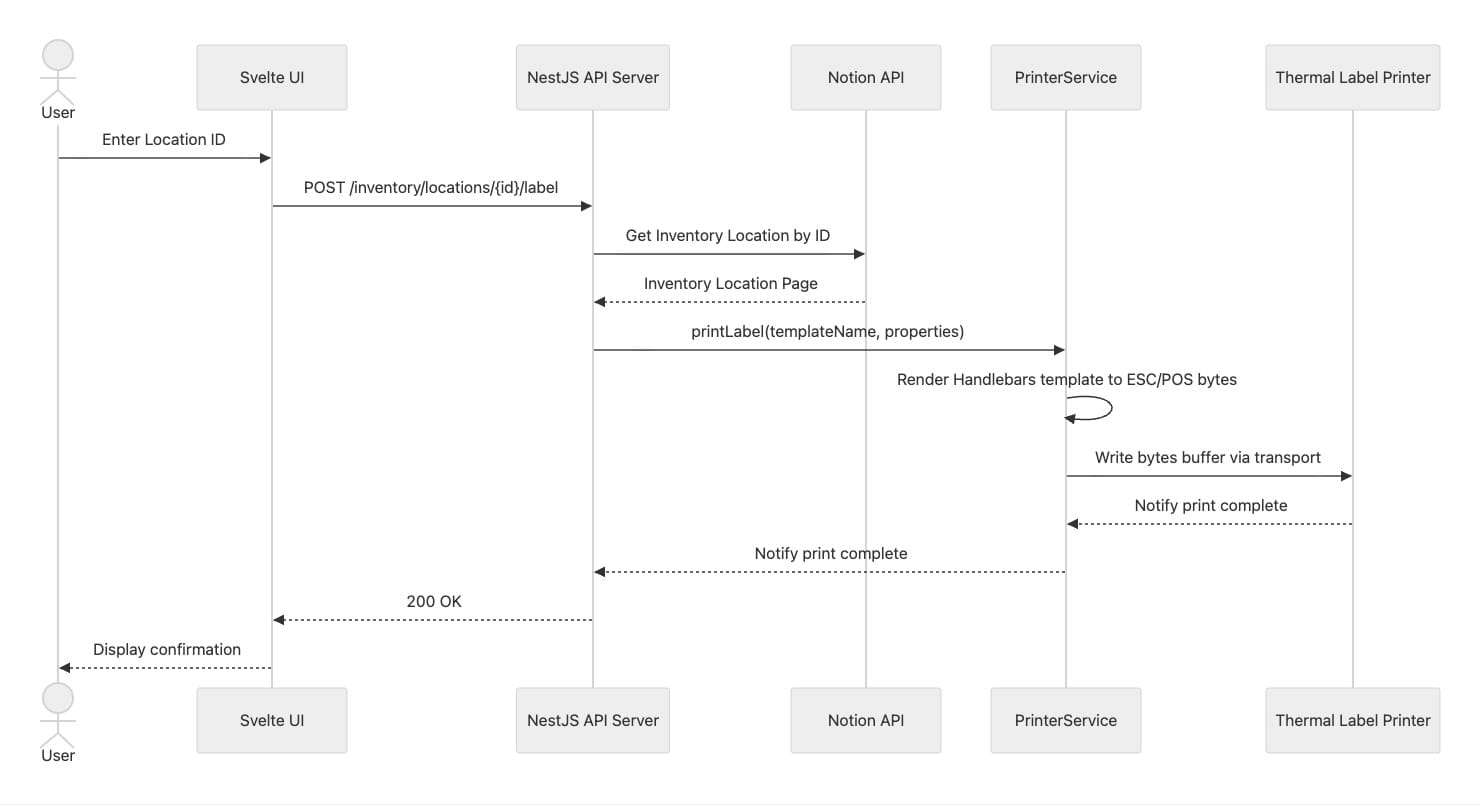
The new process became joyously simple:
- Enter the inventory location ID
- Click "Print"
Voila! A fresh label would be waiting for me at the thermal printer.
Bonus: MCP Server for AI-Agent Connectivity
Want to allow AI-agents to print labels?
See: How My AI Agents Talk to My Thermal Printer (Using an MCP Server)
References
[[1]] https://en.wikipedia.org/wiki/IBM_MT/ST
[[2]] https://deming.org/a-bad-system-will-beat-a-good-person-every-time/
Comments ()